
Skip to content
Mistfall HunterFIELD GRIMOIRE

Patch 7 August 2026 update
Updated 2026-08-12

Mistfall Hunter Otto the Flesheater Guide

All seven Flesheater attacks and the glow that precedes each one — including the two colours that mean your tank is about to lose him and he is coming for the nearest damage dealer.

Applies to 7 August 2026 updateUpdated

By

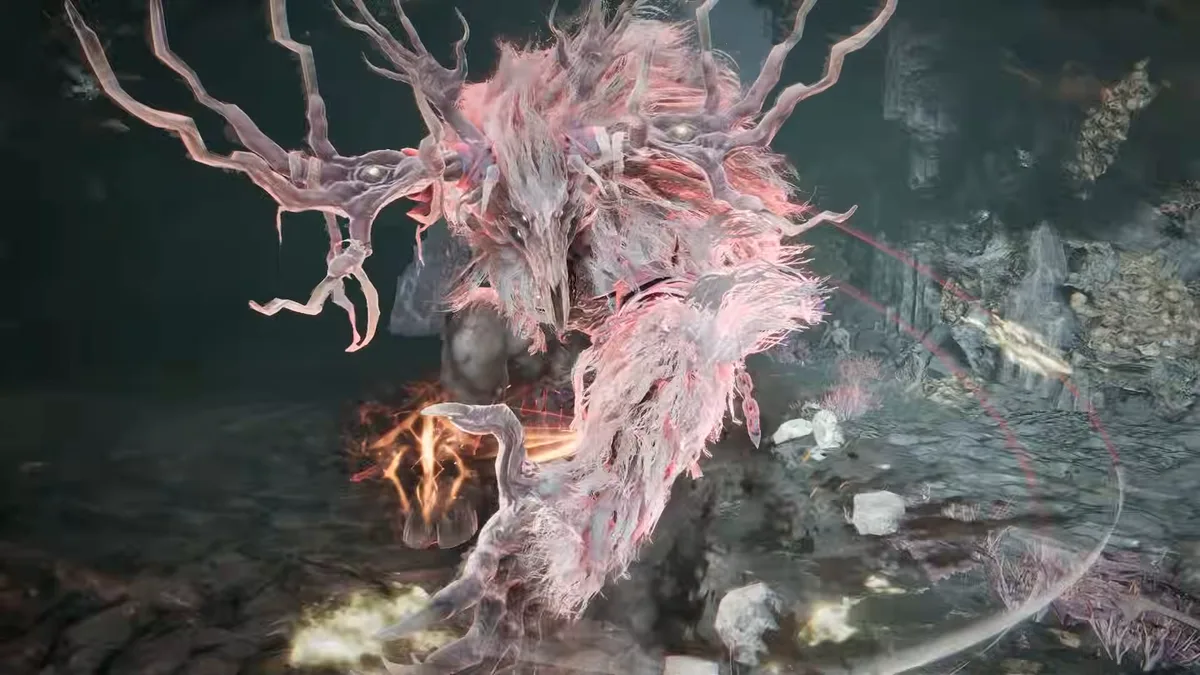
Otto, the Flesheater — an antlered, shaggy Mist Lord rearing mid-roar
Image: Bellring Games — Boss Reveal: Otto, the Flesheater (12 June 2026)

The move list here comes from one games-media battle guide, the only publication that names the Flesheater’s attacks individually and describes a tell for each; two other sites ran the same seven moves in the same order over the following two days, so they corroborate nothing — they are the same guide rewritten. Three further mechanics come from Bellring’s own Boss Reveal captions and are marked as such, with the caveat that the reveal is beta-era. Where a source contradicts itself, this page says so instead of choosing.

At a glance

Where
Brandrgarde, the Main Hall at the middle of the map — three entrances, east, south and west
When
The barrier opens around minute 20, cued by a Soekja warning on screen
The real threat
Red and golden attacks reset his aggro onto the nearest damage dealer
The clock
Bellring’s own reveal says to kill him quickly or he enters Enrage mode
Free damage
Knock him down, then hit the head — the publisher’s own instruction
Team
Written up as a trio: a Withered Knight or Mercenary tank, a Sorcerer or Blackarrow, and a Seer

Otto, the Flesheater — every move

No phases: the published guide describes one continuous fight, so this is one list. Each move is three lines in the same order: what you see, what you do, and what it costs if you read it wrong — which is the line that decides whether a move deserves your dodge or your health bar.

  • Red — unblockable
  • Golden — corrupted
  • Yellow — pools incoming
PouncePressure
You seeHe prowls, then jumps forward, and lands with a slash to both sides.
You doDodge just before he lands, and dodge forward. Rolling sideways is the mistake — it puts you exactly where the follow-up claw goes. This one can be blocked and parried.
If wrongThe landing slash catches anyone who dodged the jump but not the direction.
Charged PounceCan end it

Red — unblockable

You seeThe same prowl and jump, but he glows red first.
You doDodge it, forward as before. The red means blocking and parrying are off the table, so the shield is not an answer here.
If wrongA tank who treats this like the ordinary pounce takes it on a block that does not exist. It also resets his aggro.
BerserkPressure
You seeA run of claw attacks while he walks forward.
You doGet to his sides, or get out of range. Blockable and parryable if you would rather hold the line than move.
If wrongStanding in front of it means eating the whole succession rather than one hit.
Berserk FuryCan end it

Red — unblockable

You seeHe screams in fury, then releases a series of attacks that travel toward whoever holds aggro.
You doDistance, immediately, and as the animation starts rather than after. This is a Powerful Attack — the red category — so nothing blocks it.
If wrongThe source’s own phrasing is that the way to avoid being destroyed is to stay away. It resets his aggro too.
Ground SmashPressure
You seeHe pounds the ground and an arc of flying rocks comes off it.
You doDodge through or hold your distance. It hits everyone around him, so this is the one that punishes a stacked team rather than one player.
If wrongCheap on its own, expensive if it catches the Seer and the tank together.
Corrupted Ground SmashCan end it

Golden — corrupted

You seeHe is empowered by the Gyldenmist corruption and glows a distinct golden light before the smash.
You doBack off. The explosions come in a branched pattern rather than a ring, so read where the branches go instead of just rolling once.
If wrongHeavy damage plus a movement-speed debuff, which is the part that kills — slowed, you will not clear the next one. This also resets his aggro.
Gyldenblod PukePunish window

Yellow — pools incoming

You seeHe glows yellow and screams, then regurgitates Gyldenblod and walks around trailing small pools.
You doIf you hold aggro, walk him into the northern wall and stop moving. The pools follow where he goes, so a tank who kites in circles paints the arena and the damage dealers have nowhere left to stand.
If wrongNot the hit — the geometry. A badly led puke phase is what turns a winnable fight into one with no safe ground.
  • Can end the attempt
  • Your punish window
  • Ordinary pressure

The boss’s name is the publisher’s, taken from its own Boss Reveal. Every move below comes from the single published guide cited at the foot of this page, so the threat flags are that writer’s emphasis and not measured damage. There are no phase tabs because the source describes no phase structure — an invented boundary would tell you the fight changes at a point nobody has published. This block is the page’s content rather than a summary of it.

The receipt

Caption over Mistfall Hunter gameplay footage reading: Defeat the monster quickly, or it will enter Enrage mode
At 1:00 in Bellring Games’ own Boss Reveal for Otto, captioned over its gameplay footage. This is the only statement anywhere that the fight has a clock, and it is the publisher’s. The video closes on an Open Beta call to action, so it describes the June 2026 build. Bellring Games — Boss Reveal: Otto, the Flesheater, captured 10 August 2026. Check the live page — it is the authority, not this crop.
§01

The glow is the whole fight

Sálmar’s tells are shapes: a staff raised, a slide, a fan of four. Otto’s are colours, and there are three of them with three different meanings. Learn the colours and you have learned most of the fight, because the colour tells you both what is coming and — for two of the three — that the fight is about to change target. Red means it cannot be parried or blocked, no matter what your shield says. Golden means the Gyldenmist has empowered him and a branched explosion pattern is coming with a slow attached. Yellow is the only one that is not aimed at you: it means the floor is about to become the problem.

  • Red and golden both reset his aggro onto the nearest damage dealer. That is the single most important sentence on this page for anyone playing Sorcerer or Blackarrow: the moment he lights up in either colour, you are a candidate to be the new tank.
  • Yellow does not reset aggro, which is why the puke is the tank’s job to solve rather than everyone’s.
  • Two of the seven attacks can be blocked and parried and the rest cannot. A Withered Knight holding the shield up through a red attack is not being cautious, they are taking full damage.
§02

A sealed arena on a clock

The Main Hall sits at the middle of Brandrgarde and stays shut until roughly minute 20 of the run, when Soekja — the White Raven — puts a warning cue on screen to say the Mist Lord can be fought. There are three ways in, east, south and west. Walking in is the commitment: the fight starts, and the barrier seals behind you so no other team can interfere. That is protection and a trap in the same mechanic, because it also means you cannot leave.

  • Both Brandrgarde Mist Lords use this one arena. Otto and Harald share it, and the source is explicit that facing the wrong one means rejoining the map to try again — so the arena does not tell you which fight you are about to have.
  • When he dies you get roughly 45 seconds to loot him and reach the portal before the teams waiting outside come in. This is an extraction game, and the Mist Lord is not the last fight.
  • The portal always drops you at the centre of the final Gyldenmist corruption circle. Arrive without Souls of Return and you are stranded in the worst part of the map with no way out — bring them before you open the barrier, not after.
§03

The composition, and the contradiction inside it

The recommended trio is a Withered Knight or Mercenary tank, a Sorcerer or Blackarrow on damage, and a Seer supporting. The Withered Knight is asked specifically to switch into Polearm & Shield, hold the aggro, block what can be blocked and keep him occupied. That is worth noting on this site in particular, because the solo tier list puts Polearm & Shield at the very bottom — and this is the fight it was built for. The stance’s own developer note describes team utility and battlefield roles, and a sealed three-role boss arena is what that reads like in practice.

  • The source says in the same breath that the Flesheater is highly resistant to ranged attacks and magic, and then recommends a Sorcerer or Blackarrow as the damage dealer. It resolves this by saying melee does a bit more but that mixed damage types and teamwork are what actually fell him — so read the ranged pick as a role in a composition rather than as the efficient way to hurt him.
  • The Seer is asked to rotate between the back of the boss and the front line to take pressure off the tank while it heals, rather than to stand at range and top people up.
  • The Mercenary is offered as the alternative tank. Nothing in the guide separates them, so pick the one you have played.
§04

Three things the publisher said that no guide repeats

Otto’s Boss Reveal is the odd one out among the three. Sálmar’s and Harald’s are cinematics; his has instructional captions burned over the gameplay, and they are the only mechanics for this fight that come from Bellring rather than from a writer. None of the guides covering him mention them, because they are in a video rather than in text. All three are beta-era — the reveal went up on 12 June 2026 and ends on an Open Beta call to action — so treat them as the developers’ stated design intent six weeks before launch rather than as a description of today’s build.

  • “After knocking the monster down strike its head to deal massive damage.” A knockdown is not just a pause in his offence, it is a damage window with a location attached — and nothing in the written guide mentions the head at all.
  • “Watch out for lingering flames on the ground.” This is the floor-denial problem the Gyldenblod pools and the corrupted smash both create, stated by the publisher as a thing to plan around rather than a thing to dodge once.
  • “Defeat the monster quickly, or it will enter Enrage mode.” So there is a clock, and it is his rather than the run’s. The written guide describes no timer, which is why every text guide to this fight reads as though you can take as long as you like.
§05

What nobody has published about him

Being explicit about the holes matters more here than on most pages, because a great deal of confident Otto content exists and a lot of it is the same article three times. The published guide describes no phase structure at all, so claims that a final phase begins when golden fire erupts around the arena are not in it and are not repeated here. The Enrage mode above is a real mechanic on the publisher’s own word — but nobody has published what triggers it, how long you have, or what it changes about his moveset, so this page can tell you it exists and not how to beat it. And the triple and quadruple dash strings people describe come from a playtest video recorded more than a year before launch, on a build that no longer exists.

  • No health figure appears here, because no datamined profile has been published for Otto specifically. Harald’s has — see his page for how a Brandrgarde Mist Lord’s health scales by mode, and note that the same table would be the source for Otto’s if it existed.
  • One of the two derivative rewrites puts a yellow glow on Berserk Fury. The original and the other rewrite both say red, and red is the game’s established unblockable colour, so this page says red.
  • The equipment-value minimum and the item said to trigger Einherjar mode on demand each appear in exactly one place. Neither is in the guide this page is built on.
  • The minute-20 barrier is when you may start, not when you must finish. It is unrelated to the Enrage clock, and conflating the two is the most likely way to misread this fight.

Otto, the Flesheater FAQ

Learn the three glows. Red means the attack cannot be blocked or parried and you must move; golden means a branched explosion pattern with a movement-speed debuff attached; yellow means he is about to trail damage pools across the floor. Bring a trio — a Withered Knight in Polearm & Shield or a Mercenary to hold aggro, a Sorcerer or Blackarrow on damage, and a Seer — and have the tank walk the yellow phase into the northern wall so the pools stay in one place.

Sources for this page

  • Game Rant — How to Beat the Flesheater (Mist Lord Battle Guide), Lucas Simons, 6 August 2026The only publication with Otto’s attacks named individually and a described tell for each, and the sole source for every mechanic on his page. Also the source for the sealed arena, the three entrances, the Soekja warning cue, the aggro reset on red and golden attacks, the 45-second loot window, and the fact that both Brandrgarde Mist Lords share one arena. Two other sites published the same seven moves in the same order over the following two days; neither is independent corroboration.
  • Bellring Games — Boss Reveal: Otto, the Flesheater, 12 June 2026Official, and beta-era — the video closes on an Open Beta call to action, six weeks before launch. Unlike the other Boss Reveals it is not purely cinematic: three instructional captions appear over the footage, and they are the only publisher-stated Otto mechanics anywhere. Verbatim, in order: "After knocking the monster down strike its head to deal massive damage" at 0:28, "Watch out for lingering flames on the ground" at 0:42, and "Defeat the monster quickly, or it will enter Enrage mode" at 1:00.
  • Mistfall Hunter official YouTube channel — Boss Reveal seriesOfficial — the publisher naming its own launch bosses: Sálmar, the Cursed Moonwane, Otto, the Flesheater and General Harald each have a Boss Reveal. The reveals are cinematic, so they establish names and nothing about mechanics.
  • DevNote #7 — 24 July 2026Official — the Soul Harvest ritual, the Soulgnawer, the Fate Chart season concept and the free Slumbering Contract battle pass.

Before you open the barrier

Bosses and Mist Lords — the rules every boss fight sharesBrandrgarde map and extraction guideSálmar, the Cursed Moonwane — every move, and what each tell meansGeneral Harald — no moveset published, and what is known insteadDeath and recovery — what a failed attempt actually costsTraining grounds — rehearse the class you intend to bringGold farming — how to afford the potions this fight needs